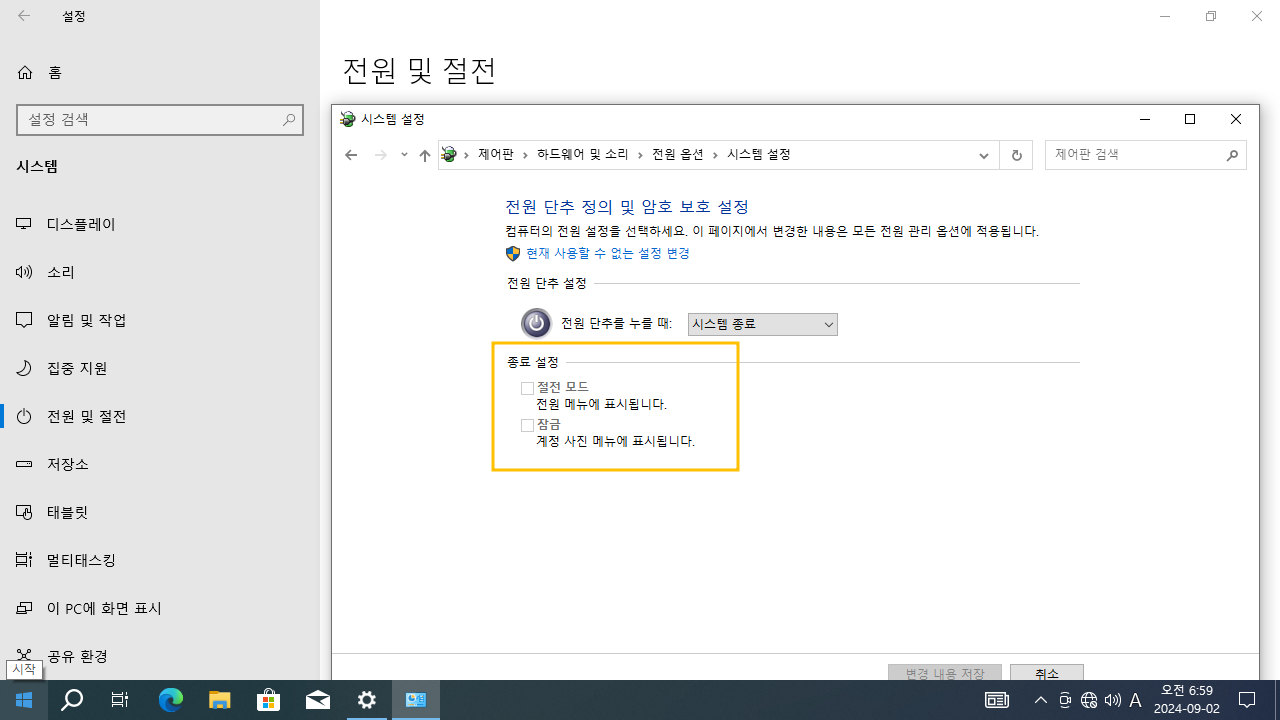
Windows 10 Shutdown settings (Sleep, Lock) Show menu
Start > Windows Settings > System > Power & sleep > Additional power settings Control Panel > All Control Panel Items > Power Options > System Settings > Choose what the power button does > Shutdown settings
윈도우10 종료 설정 (절전 모드, 잠금) 메뉴 표시
시작 > Windows 설정 > 시스템 > 전원 및 절전 > 추가 전원 설정 제어판 > 하드웨어 및 소리 > 전원 옵션 > 시스템 설정 > 전원 단추 작동 설정 > 종료 설정
영상보기 : https://youtu.be/86JB2A0iOoA
이 두 명령어는 Windows 레지스트리에서 특정 설정을 추가하거나 수정하여 Windows 탐색기(Explorer)에서 Flyout Menu의 잠금 옵션(Lock Option)과 절전 모드(Sleep Option)을 모두 비활성화합니다. 사용자가 시스템을 잠그거나 절전 모드로 전환하는 옵션을 Flyout Menu에서 숨기고자 할 때 사용됩니다.
www.youtube.com/@XTRM
소프트엑스 XTRM
SOFTware unknown X of XTRM 컴퓨터 유지보수 기술 공유 채널입니다.
출처: https://xtrm.tistory.com/419 [XTRM MEDIA SERVER:티스토리]
※ 티스토리 페이지 비밀번호는 유튜브 영상 "...더보기" 설명란에 있습니다.
Windows 10에서 전원 메뉴에 절전 모드를 추가하거나 제거하는 방법
절전 모드는 전력을 거의 사용하지 않고 PC가 더 빨리 시작되며 중단한 지점으로 바로 돌아갈 수 있습니다. 배터리가 너무 낮으면 Windows가 모든 작업을 자동으로 저장하고 PC를 끄므로 배터리가 소모되어 작업이 손실될까 봐 걱정할 필요가 없습니다. 커피 브레이크를 취하는 경우처럼 잠시 PC에서 벗어날 때 절전 모드를 사용하세요.
많은 PC(특히 노트북과 태블릿)의 경우 덮개를 닫거나 전원 버튼을 누르면 PC가 절전 모드로 전환됩니다. 이 자습서에서는 Windows 10 에서 모든 사용자의 전원 메뉴 에 절전 모드가 표시되지 않도록 추가하거나 제거하는 방법을 보여줍니다.
전원 메뉴에서 절전 모드를 추가하거나 제거하려면 관리자 로 로그인해야 합니다 .
옵션 1: 전원 옵션을 사용하여 전원 메뉴에서 절전 모드 추가 또는 제거
옵션 2: REG 파일을 사용하여 전원 메뉴에서 절전 모드 추가 또는 제거
옵션 3: 로컬 그룹 정책 편집기를 사용하여 전원 메뉴에서 절전 모드 추가 또는 제거
옵션 4: REG 파일을 사용하여 그룹 정책을 통해 전원 메뉴에서 절전 모드 추가 또는 제거
OPTION ONE
Add or Remove Sleep in Power Menu using Power Options
1 Open the Control Panel (icons view), and click/tap on the Power Options icon.
2 Click/tap on the Choose what the power buttons do link on the left side.
3 Click/tap on the Change settings that are currently unavailable link at the top.
4 If prompted by UAC, click/tap on Yes.
5 Do step 6 (on) or step 7 (off) below for what you would like to do.
6. To Add Sleep to Power menu
This is the default setting
A) Check the Sleep box under Shutdown settings, and click/tap on Save changes. (see screenshot below step 7)
7. To Remove Sleep from Power menu
A) Uncheck the Sleep box under Shutdown settings, and click/tap on Save changes.
OPTION TWO
Add or Remove Sleep in Power Menu using a REG file
The downloadable .reg files below will modify the DWORD in the registry key below.
HKEY_LOCAL_MACHINE\SOFTWARE\Microsoft\Windows\CurrentVersion\Explorer\FlyoutMenuSettings
ShowSleepOption DWORD
0 = Remove
1 = Add
OPTION THREE
Add or Remove Sleep in Power Menu using Local Group Policy Editor
If enabled of disabled, this option will override and gray out Option One and Option Two.
The Local Group Policy Editor is only available in the Windows 10 Pro, Enterprise, and Education editions.
All editions can use Option Four below to set this policy.
1 Open the Local Group Policy Editor.
2 In the left pane of Local Group Policy Editor, navigate to the location below.
Computer Configuration/Administrative Templates/Windows Components/File Explorer
3 In the right pane of File Explorer in Local Group Policy Editor, double click/tap on the Show sleep in the power options menu policy to edit it.
4 Do step 5 (add), step 6 (remove), or step 7 (default) below for what you would like to do.
5. To Enable Show Sleep in Power Menu
A) Select (dot) Enabled, click/tap on OK, and go to step 8 below.
6. To Disable Show Sleep in Power Menu
A) Select (dot) Disabled, click/tap on OK, and go to step 8 below.
7. Default Sleep in Power Menu
A) Select (dot) Not Configured, click/tap on OK, and go to step 8 below.
8 When finished, you can close the Local Group Policy Editor if you like.
OPTION FOUR
Add or Remove Sleep in Power Menu via Group Policy using a REG file
If enabled of disabled, this option will override and gray out Option One and Option Two.
The downloadable .reg files below will add and modify the DWORD value in the registry key below.
HKEY_LOCAL_MACHINE\SOFTWARE\Policies\Microsoft\Windows\System
ShowSleepOption DWORD
(delete) = default
1 = Add
0 = Remove
자료 출처 : https://www.tenforums.com

 윈도우10 기본 전원 관리 옵션 - 고성능, 최고성능 | Windows 10 ...
 윈도우10 전원 단추를 누를 때 아무 것도 안 함 (전원 단추 정의...


