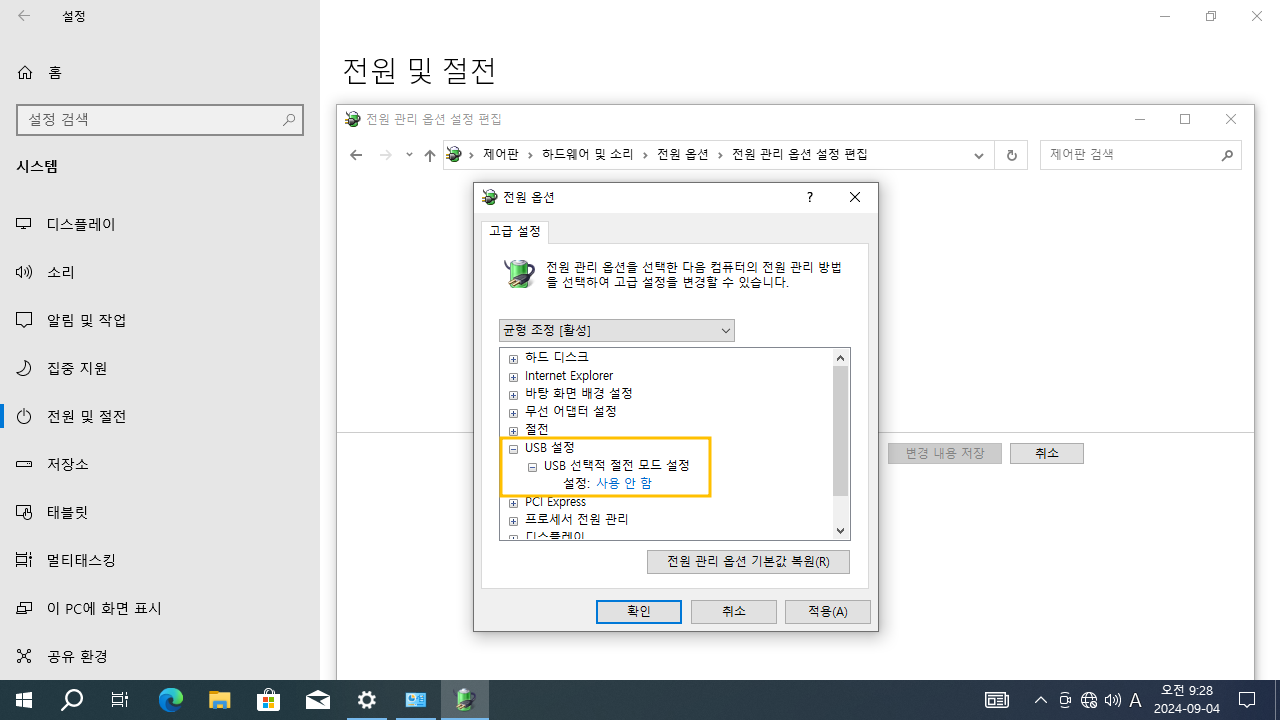
윈도우10 USB 선택적 절전 모드 설정 사용 안 함 (고급 전원 관리 옵션) | Windows 10 Power Options - Advanced power settings - USB settings - USB selective suspend setting : Disabled
| 첨부 '1' |
|---|
Windows 10 USB selective suspend setting
Start > Windows Settings > System > Power & sleep > Additional power settingsControl Panel > All Control Panel Items > Power Options > Change settings for the plan > Change advanced power settings
- USB settings - USB selective suspend setting
윈도우10 USB 선택적 절전 모드 설정
시작 > Windows 설정 > 시스템 > 전원 및 절전 > 추가 전원 설정제어판 > 하드웨어 및 소리 > 전원 옵션 > 전원 관리 옵션 설정 편집 > 고급 전원 관리 옵션 설정 변경
- USB 설정 - USB 선택적 절전 모드 설정
영상보기 : https://youtu.be/9SnYK-QMhPQ
이 명령어는 Windows의 powercfg.exe 도구를 사용하여 현재 활성화된 전원 계획에서 AC 전원 상태일 때 USB 선택적 절전 모드를 비활성화합니다. 이로 인해 USB 장치는 유휴 상태에서도 전원이 차단되지 않고 계속 연결된 상태를 유지하게 됩니다.
이 명령어를 실행하면, 현재 활성화된 전원 계획에서 AC 전원 상태일 때 USB 선택적 절전 모드가 비활성화됩니다. 즉, USB 장치가 유휴 상태가 되더라도 전원이 차단되지 않고 계속 전원을 유지하게 됩니다.
www.youtube.com/@XTRM
소프트엑스 XTRM
SOFTware unknown X of XTRM 컴퓨터 유지보수 기술 공유 채널입니다.
출처: https://xtrm.tistory.com/425 [XTRM MEDIA SERVER:티스토리]
※ 티스토리 페이지 비밀번호는 유튜브 영상 "...더보기" 설명란에 있습니다.
Windows 10에서 디스플레이 끄기 시간을 변경하는 방법
연결된 모든 디스플레이가 꺼지기 전에 PC가 비활성 상태인 시간을 지정할 수 있습니다.
디스플레이가 꺼지면 마우스를 움직이거나, 터치패드나 터치스크린을 터치하거나, 마우스나 터치패드 버튼을 클릭하거나, 키를 눌러 디스플레이를 다시 켜면 됩니다. 이 튜토리얼에서는 Windows 10 에서 디스플레이가 자동으로 꺼지기
전에 PC가 비활성 상태인 시간을 지정하는 방법을 보여줍니다.
'화면 끄기'를 '절대 안 함' 으로 설정 하면 , 콘솔 잠금 화면 끄기 시간 초과로 인해 화면이 꺼지는 현상 도 방지됩니다 .
옵션 1: 설정에서 시간 이후에 디스플레이 끄기 변경
옵션 2: 전원 계획 설정에서 시간 경과 후 디스플레이 끄기 변경
옵션 3: 고급 전원 계획 설정에서 시간 경과 후 디스플레이 끄기 변경
옵션 4: 명령 프롬프트에서 시간 경과 후 디스플레이 끄기 변경
OPTION ONE
To Change Turn Off Display After Time in Settings
This will change the settings in your currently selected default power plan.
1 Open Settings, and click/tap on the System icon.
2 Click/tap on Power & sleep on the left side, and select how many minutes you want to turn off the display(s) under Screen on the right side.
If you PC doesn't have battery power, then you will only see one option.
3 When finished, you can close Settings if you like.
OPTION TWO
To Change Turn Off Display After Time in Power Plan Settings
1 Open your power plan settings.
2 To the right of Turn off the display, select how many minutes you want to turn off the display(s), and click/tap on Save changes when finished.
If you PC doesn't have battery power, then you will only see one option.
If you do not want your displays to turn off, then select Never.
3 When finished, you can close Power Options if you like.
OPTION THREE
To Change Turn Off Display After Time in Advanced Power Plan Settings
1 Open your advanced power plan settings.
2 Scroll down and expand Display and Turn off display after. Select or enter how many minutes you want to turn off the display(s), and click/tap on OK when finished.
If you PC doesn't have battery power, then you will only see one option.
If you do not want your displays to turn off, then select Never.
3 When finished, you can close Power Options if you like.
OPTION FOUR
To Change Turn Off Display After Time in Command Prompt
1 Open a command prompt.
2 Type the command(s) below you want to use into the command prompt, and press Enter.
(On battery)
powercfg -change -monitor-timeout-dc <minutes>
OR
powercfg /SETDCVALUEINDEX SCHEME_CURRENT 7516b95f-f776-4464-8c53-06167f40cc99 3c0bc021-c8a8-4e07-a973-6b14cbcb2b7e <seconds>
AND/OR
(Plugged in)
powercfg -change -monitor-timeout-ac <minutes>
OR
powercfg /SETACVALUEINDEX SCHEME_CURRENT 7516b95f-f776-4464-8c53-06167f40cc99 3c0bc021-c8a8-4e07-a973-6b14cbcb2b7e <seconds>
Substitute <minutes> in the commands above with how many minutes you want to turn off display after.
Substitute <seconds> in the commands above with how many seconds you want to turn off display after.
Using 0 (zero) minutes or seconds will be the same as "Never".
자료 출처 : https://www.tenforums.com

 윈도우10 디스플레이 다음 시간 이후에 끄기 사용 안 함 (고급 전...
 윈도우10 절전 모드 해제 타이머 허용 사용 안 함 (고급 전원 관...